# Implementation Principles and Deployment Architecture of CNI Ipamd Pre-allocated VPC IP
## Background and Principles
Due to the current situation of the underlying network technology of Genesis Cloud, after a new application of the Pod's VPC IP, it needs to conduct [arping](https://www.rfc-editor.org/rfc/rfc5227) first to ensure that the flow table has been issued and there are no conflicts. This process takes at least 5 seconds and up to 15 seconds. In other words, it takes at least 5 seconds for a Pod to be created, and with image pulling and various initialization operations, the average Pod creation time is extended to more than 10 seconds. This is almost unacceptable for Pods that require rapid startup and destruction.
Moreover, since the creation and destruction of all Pods require calling the VPC service, when the VPC service is unreachable due to various factors, Pods cannot be created or destroyed, leaving the cluster in an almost unusable state and completely blocking the release process.
To address the above issues, at the CNI layer, a batch of VPC IPs can be pre-allocated, and a VPC IP pool can be maintained to allocate IPs from the pool to newly created Pods. Since the IPs in the pool have been pre-applied through the UNetwork API and the arping operation has been completed, they can be immediately allocated to Pods, reducing the Pod creation time by 5-15 seconds.
In addition, when the VPC is down, the pool can also bypass the VPC service to independently handle the application and recycling of Pod IPs (when the pool has sufficient IPs), improving cluster availability.
## Detailed Explanation of CNI Preallocation IP Solution
The new version of CNI is divided into two parts:
* cnivpc binary file: Serves as the entry point for communication with Kubelet. Kubelet invokes this binary to create and remove Pod networks.
* ipamd service: A resident Daemon process responsible for applying for, maintaining, and releasing VPC IPs. It provides gRPC APIs for allocating and releasing VPC IPs to cnivpc via Unix Domain Socket, deployed as a DaemonSet in the UK8S cluster. It can be understood as a component similar to [Calico IPAM](https://docs.tigera.io/calico/latest/networking/ipam/get-started-ip-addresses).
The overall architecture is shown in the figure below.
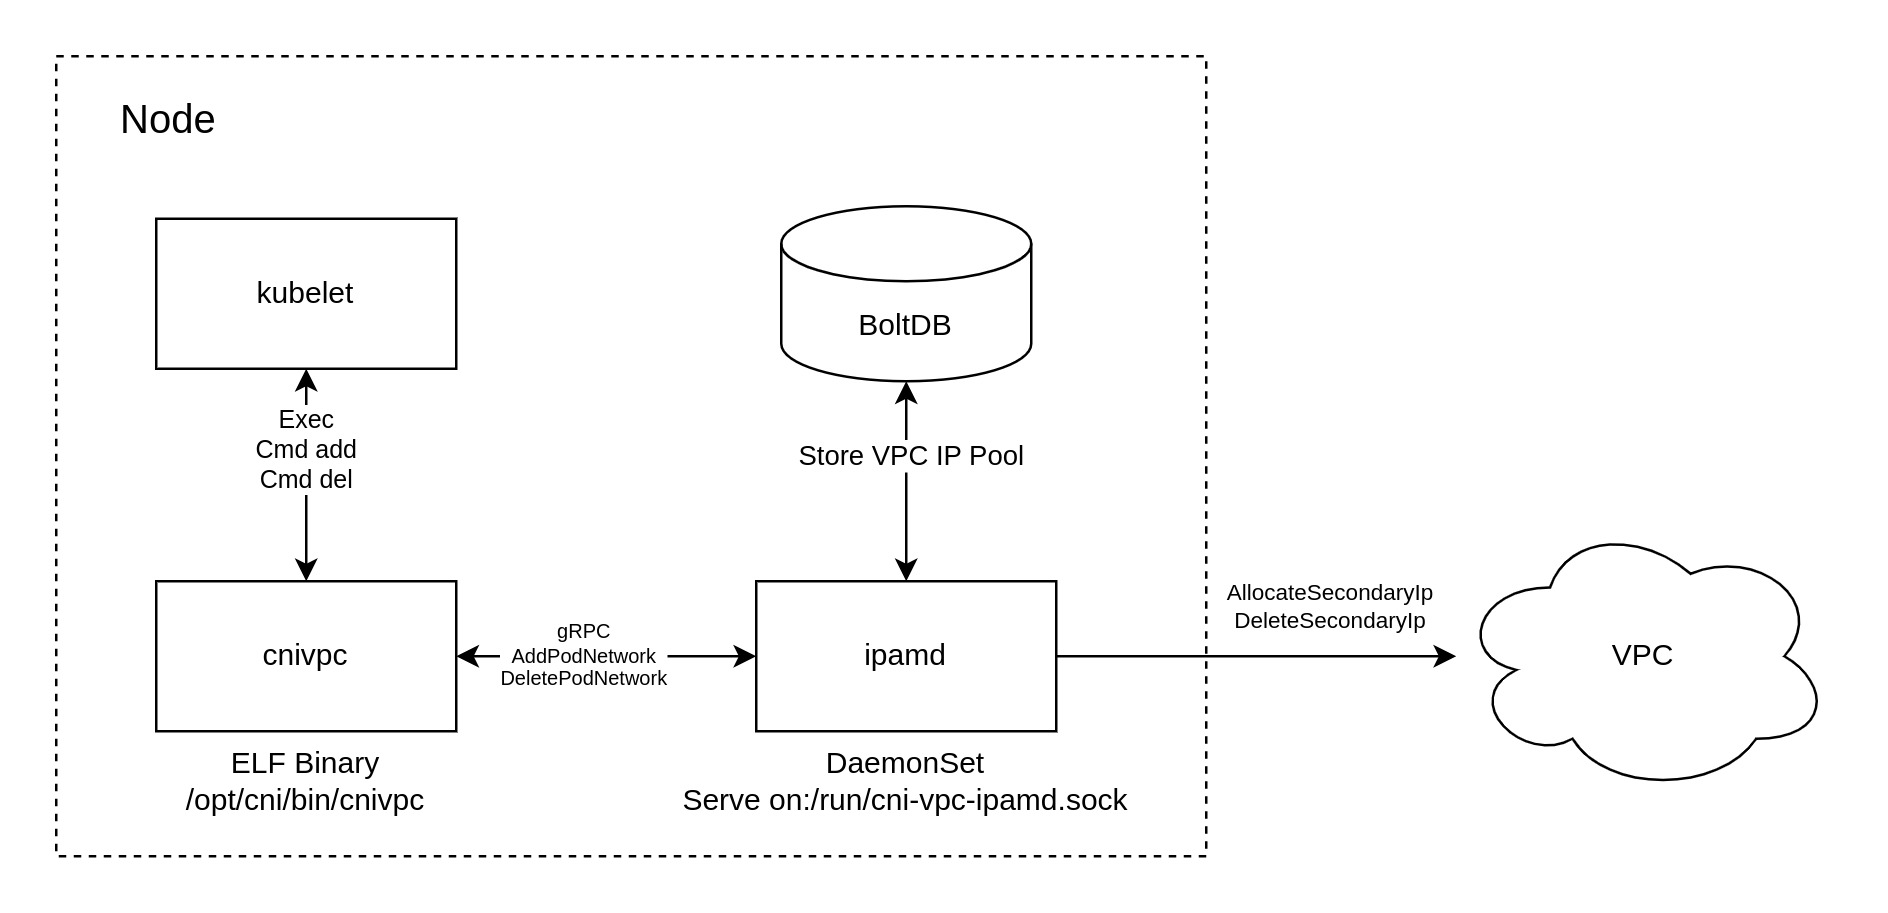
**The core process includes:**
1. ipamd internally contains a control loop, which periodically checks from BoltDB (local database) whether the currently available VPC IP is lower than the low watermark of the IP pool. If it is lower than the low watermark, it calls the UNetwork AllocateSecondaryIp API to allocate IP to the node and store the IP in BoltDB. If the VPC IP is higher than the high watermark, call UNetwork DeleteSeconaryIp to release the excess IP in BoltDB.
2. ipamd provides the following three gRPC interfaces to cnivpc through unix:/run/cni-vpc-ipamd.sock:
* **Ping**: ipamd service availability probe interface. cnivpc will call this interface every time before asking for and releasing IP. If it fails, cnivpc's workflow will degrade back to the original solution.
* **AddPodNetwork**: An interface to assign IP to the Pod. If there is an available IP in the BoltDB IP pool, the IP will be allocated to the Pod directly from the IP pool; otherwise, an IP will be applied directly from the UNetwork API, and in this case, it still takes 5-15 seconds to start the Pod.
* **DelPodNetwork**: Interface to release Pod IP. After the Pod is destroyed, the IP will enter the cooling state. After cooling for 30s, it will be put back into the IP pool.
3. If the ipamd service is killed, it will respond to the SIGTERM signal sent by Kubelet, stop the gRPC service and delete the corresponding Unix Domain Socket file.
4. The ipamd service is an optional component, even if it terminates abnormally, cnivpc can work normally, but it will lose the ability of pre-allocation.
5. If ipamd finds that the IP of VPC has been allocated, it will try to borrow IP from the pool of other ipamd in the same subnet. If other ipamd do not have available IP, creating the Pod will report an error.
## Related entry parameters
* **--availablePodIPLowWatermark=3**: VPC IP pre-allocation low watermark, unit: individual. The default is 3.
* **--availablePodIPHighWatermark=50**: VPC IP pre-allocation high watermark, unit: individual. The default is 50.
* **--cooldownPeriodSeconds=30**: VPC IP cooling time. After the Pod IP is returned, it needs to be cooled before it can be put back into the pool. This is to ensure the destruction of the route, in seconds. The default is 30s.
## Deployment method
Directly deploy [cni-vpc-ipamd.yml](https://github.com/ucloud/uk8s-cni-vpc/blob/main/deploy/ipamd.yaml) in the cluster.
Check if ipamd is started:
```
# kubectl get pod -o wide -n kube-system -l app=cni-vpc-ipamd
NAME READY STATUS RESTARTS AGE IP NODE NOMINATED NODE READINESS GATES
cni-vpc-ipamd-6v6x8 1/1 Running 0 59s 10.10.135.117 10.10.135.117
cni-vpc-ipamd-tcc5b 1/1 Running 0 59s 10.10.7.12 10.10.7.12
cni-vpc-ipamd-zsspc 1/1 Running 0 59s 10.10.183.70 10.10.183.70
```
**Notice: ipamd will be installed by default in clusters with version 1.20 or above**
## Debug
In a cluster where ipamd is installed, you can use the `cnivpctl` command to view the pool situation in the cluster.
Log in to any node (can be master or node), and the following command can list the nodes in the cluster that use ipamd, and the number of IPs in their pool:
```shell
$ cnivpctl get node
NODE SUBNET POOL
192.168.45.101 subnet-dsck39bnlhu 9
192.168.47.103 subnet-dsck39bnlhu 4
```
You can see that there are currently two nodes in my cluster, with 9 and 4 IPs in the pool, respectively.
By `cnivpctl get pool` you can further view all IPs in a node pool:
```shell
$ cnivpctl -n 192.168.45.101 get pool
IP RECYCLED COOLDOWN AGE
192.168.32.35 21h false 21h
192.168.34.138 21h false 21h
192.168.35.38 21h false 21h
192.168.36.86 21h false 21h
192.168.43.106 21h false 21h
192.168.43.227 false 21h
192.168.45.207 21h false 21h
192.168.45.229 false 21h
192.168.45.59 false 21h
```
Without adding `-n` parameter, you can see all pool IPs, through `-o wide` you can also list nodes simultaneously:
```shell
$ cnivpctl get pool -owide
IP RECYCLED COOLDOWN AGE NODE
192.168.32.35 21h false 21h 192.168.45.101
192.168.34.138 21h false 21h 192.168.45.101
192.168.35.38 21h false 21h 192.168.45.101
192.168.36.86 21h false 21h 192.168.45.101
192.168.43.106 21h false 21h 192.168.45.101
192.168.43.227 false 21h 192.168.45.101
192.168.45.207 21h false 21h 192.168.45.101
192.168.45.229 false 21h 192.168.45.101
192.168.45.59 false 21h 192.168.45.101
192.168.40.121 21h false 21h 192.168.47.103
192.168.43.73 false 21h 192.168.47.103
192.168.44.59 false 21h 192.168.47.103
192.168.45.19 false 21h 192.168.47.103
```
Through `cnivpctl get pod`, you can see which IPs the Pod on a node occupies:
```shell
$ cnivpctl -n 192.168.47.103 get pod
NAMESPACE NAME IP AGE
kube-system coredns-798fcc8f9d-jzccm 192.168.42.69 21h
kube-system csi-udisk-controller-0 192.168.43.110 21h
kube-system metrics-server-fff8f8668-rgfmr 192.168.36.42 21h
default nginx-deployment-66f49c7846-gtpbk 192.168.40.14 21h
default nginx-deployment-66f49c7846-mfgp4 192.168.34.55 21h
default nginx-deployment-66f49c7846-s54jj 192.168.40.126 21h
kube-system uk8s-kubectl-68bb767f87-tpzng 192.168.42.53 21h
```
The output of this command is a bit similar to `kubectl get pod`, but will only output Pods with VPC IP and will not list `HostNetwork` or Pods using other network plug-ins.
Similarly, without adding `-n` parameter, you can also list all Pods:
```shell
$ cnivpctl get pod -owide
NAMESPACE NAME IP AGE NODE
kube-system coredns-798fcc8f9d-gdrbq 192.168.41.246 21h 192.168.45.101
kube-system coredns-798fcc8f9d-jzccm 192.168.42.69 21h 192.168.47.103
kube-system csi-udisk-controller-0 192.168.43.110 21h 192.168.47.103
kube-system metrics-server-fff8f8668-rgfmr 192.168.36.42 21h 192.168.47.103
default nginx-deployment-66f49c7846-gtpbk 192.168.40.14 21h 192.168.47.103
default nginx-deployment-66f49c7846-mfgp4 192.168.34.55 21h 192.168.47.103
default nginx-deployment-66f49c7846-s54jj 192.168.40.126 21h 192.168.47.103
kube-system uk8s-kubectl-68bb767f87-tpzng 192.168.42.53 21h 192.168.47.103
```
In addition to the above commonly used `cnivpctl` commands, there are some advanced usage, such as:
- `cnivpctl get unuse`: List leaked IPs.
- `cnivpctl pop [ip]`: Pop an IP from the specified node's pool.
- `cnivpctl push [ip]`: Assign a new IP to the specified node's pool.
- `cnivpctl release [ip]`: Release the leaked IP in the specified node (dangerous operation, execute with caution).
For more detailed usage of this command, refer to `cnivpctl -h`.
## Frequently Asked Questions
### Q: How to configure the size of the VPC IP pool water level?
A: It can be configured through the entry parameters--availablePodIPLowWatermark and --availablePodIPHighWatermark of the ipamd program, for example:
```
containers:
- name: cni-vpc-ipamd
image: uhub.genesissai.com/uk8s/cni-vpc-ipamd:1.2.3
args:
- "--availablePodIPLowWatermark=3"
- "--availablePodIPHighWatermark=50"
- "--calicoPolicyFlag=true"
- "--cooldownPeriodSeconds=30"
```
**Notice:** If the VPC IP pool water level is low and a node suddenly schedules a large number of Pods, the available IPs in the VPC IP pool may be exhausted. New Pods will use VPC IPs newly applied via the UNetwork API, and it will still take several seconds for the Pods to access the hosting area. If the VPC IP pool water level is high and the cluster has a large number of nodes, it may exhaust the subnet IP space, making new VPC IP allocation impossible.
Ensure that availablePodIPLowWatermark is less than or equal to availablePodIPHighWatermark; otherwise, ipamd will report an error on startup!
### Q: When the VPC service is down, Pod creation and deletion are affected. How to configure ipamd to eliminate this impact?
A: Yes, without ipamd, cluster Pod operations will be blocked if the VPC service fails. ipamd was designed partially to address this issue.
However, if ipamd is improperly configured (e.g., the resident IP count in the pool is too small), it cannot fully handle Pod IP allocation when the VPC is down.
For high cluster availability requirements (expecting normal operation when the Genesis Cloud VPC backend is disconnected), adjust the ipamd low watermark parameter availablePodIPLowWatermark to the maximum number of Pods per node (e.g., 110). This allows ipamd to pre-allocate sufficient IPs to support all Pod creations and deletions on the current node. For how to adjust water levels, refer to the previous section.
Although ipamd will allocate many IPs initially, it will fully manage Pod IPs afterward.
Note: Ensure the node's subnet is large enough before doing this; otherwise, ipamd cannot pre-allocate the desired number of IPs due to insufficiency.
### Q: ipamd occupies too many IPs!
A: Thanks to ipamd's borrowing mechanism, even if the subnet IPs are exhausted by ipamd, ipamd instances can schedule IPs among each other. Thus, IP scheduling issues need not be worried about.
If you prefer to reduce ipamd's IP occupation, modify the two water level parameters. In the extreme case, set them to 0, and ipamd will not pre-allocate any IPs.
### Q: If the node's BoltDB file (/opt/cni/networkstorage.db) is corrupted, will it cause VPC IP leakage?
A: Yes. In this case, log in to any node and use the following command to scan and list leaked IPs on a node:
```bash
cnivpctl get unuse -n xx.xx.xx.xx
```
After listing and confirming these IPs are unused, use the following command to clean up and release the leaked IPs:
```bash
cnivpctl release xx.xx.xx.xx
```
This command will list the IPs to be released for your secondary confirmation. Ensure they are not used by any Pods. Upon confirmation, ipamd will automatically release these IPs.
Alternatively, you can directly delete the node, and its bound VPC IPs will be automatically released.
### Q: ipamd seems to be running abnormally. How to diagnose it?
A: The call log of cnivpc is /var/log/cnivpc.log of the Node node; ipamd's log can be observed through kubectl logs, and can also be found in /var/log/ucloud/ on the Node node.
Additionally, kubelet logs are often indispensable. Log in to the Node and execute:
```
# journalctl -u kubelet --since="12:00"
```
Observe the running log of kubelet.
kubectl get events is also a useful tool for troubleshooting.
If the issue remains unresolved, please contact the UK8S technical team.